Claude Desktop MCP to aiFetchly: Complete Migration Guide
Developers using Anthropic’s Claude Desktop frequently create custom automations around the Model Context Protocol (MCP). However, desktop chatbots execute connected tools in an unconstrained sandbox without execution gates, per-tool filtering, or multi-agent orchestration. AI Fetchly provides complete compatibility with existing Claude Desktop MCP configurations, enabling you to import JSON definitions in seconds while adding granular execution governance, local token optimization, and task planning.
This tutorial walks through locating your existing configuration file, importing servers into aiFetchly, managing sensitive environment variables, and configuring granular tool governance.
Locating Your Claude Desktop Configuration
Claude Desktop stores registered MCP servers in a standard JSON format located in OS-specific application data folders:
- macOS:
~/Library/Application Support/Claude/claude_desktop_config.json - Windows:
%APPDATA%\Claude\claude_desktop_config.json - Linux:
~/.config/Claude/claude_desktop_config.json
Inside this file, external integrations reside under the root mcpServers object, declaring command executables, argument arrays, and runtime environment variables.
Configuration Verification: Before initiating the import, verify that your JSON structure is well-formed and ensure commands referencing local runtimes (such as Node or Python virtual environments) use absolute filesystem paths.
Step 1: Automated Configuration Import
aiFetchly inspects default system directories automatically to identify installed MCP integrations.
- Launch AI Fetchly and navigate to Settings > Integrations > MCP Servers.
- Click Import from Claude Desktop in the top action bar.
- Choose the auto-detected path or click browse to point directly to your
claude_desktop_config.json. - Review the parsed server list and click Import Selected.
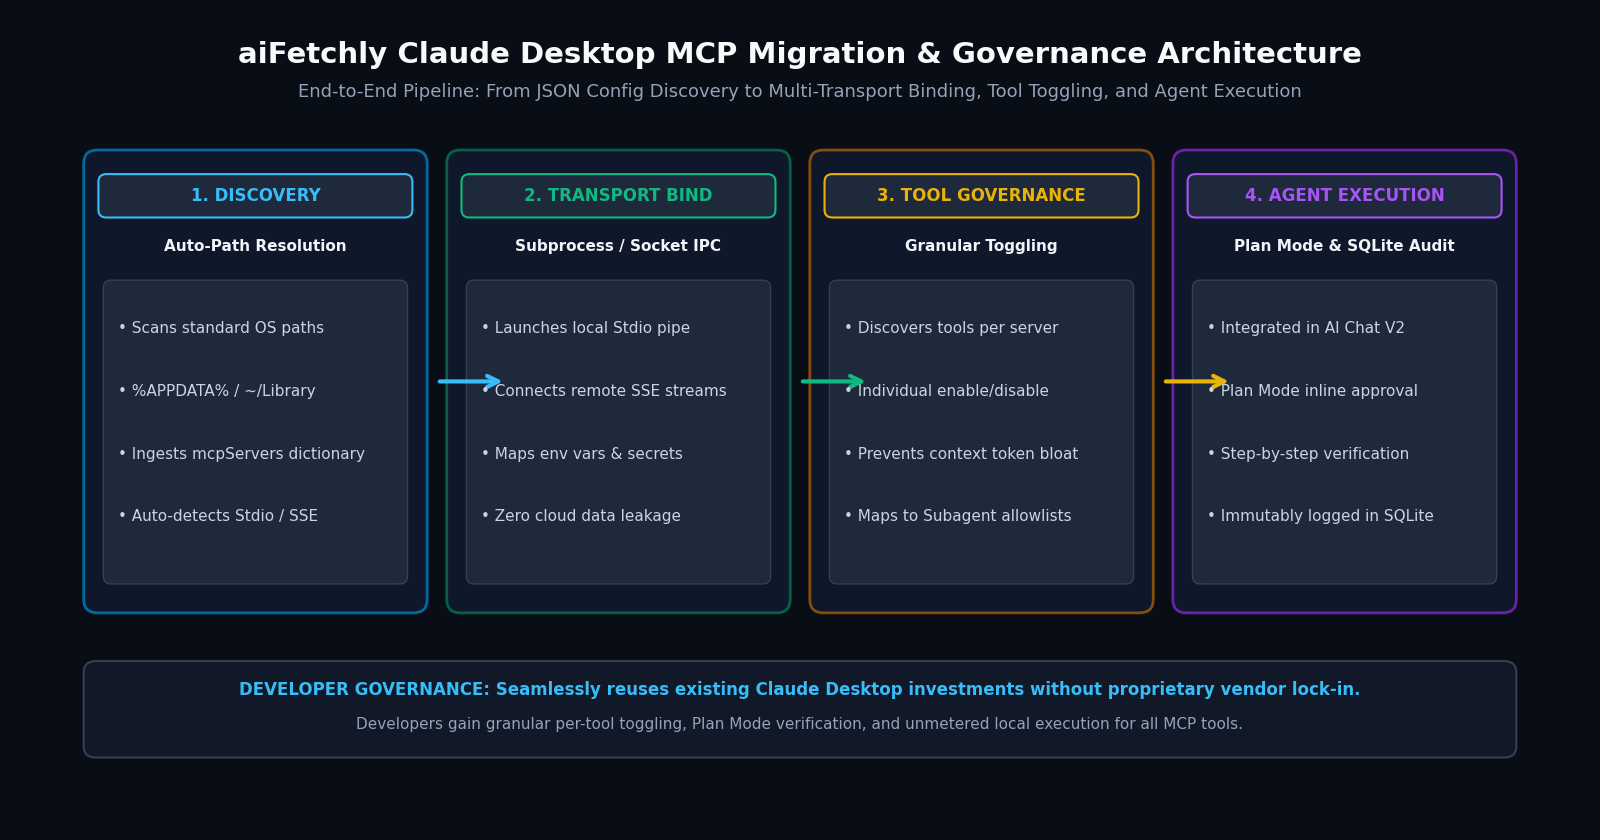
aiFetchly parses every defined server, stores environment parameters in encrypted local storage, and initializes endpoints without touching or modifying your original Claude configuration.
Step 2: Protocol Transport and Secret Management
aiFetchly supports standard stdio child processes and remote sse (Server-Sent Events) HTTP connections. When working with authenticated servers like GitHub, PostgreSQL, or Brave Search, aiFetchly manages your credentials securely on your machine:
{
  "mcpServers": {
    "github-tools": {
      "command": "npx",
      "args": ["-y", "@modelcontextprotocol/server-github"],
      "env": {
        "GITHUB_PERSONAL_ACCESS_TOKEN": "ghp_yourTokenHere"
      }
    }
  }
} After import, aiFetchly launches the background process, handles protocol handshakes, and catalogs every tool, prompt, and resource definition exposed by the server.
Step 3: Granular Tool Filtering and Execution Governance
In Claude Desktop, connecting an MCP server exposes every declared tool directly to the model context. This behavior rapidly exhausts prompt token limits and increases the likelihood of model hallucinations.
aiFetchly introduces per-tool enablement controls and interactive approval gates:
Granular Tool Toggles: Enable only the exact tools needed for your workflow. Disable dangerous mutations or unnecessary utilities to preserve context tokens and prevent accidental changes.
- Token Preservation: Disable verbose database schema inspectors when your task only requires simple read operations.
- Interactive Plan Mode: High-impact or destructive tool calls require explicit user confirmation before executing.
- Subagent Scoping: Assign imported MCP tools exclusively to dedicated subagents rather than polluting the root orchestrator.
- Audit Logging: Inspect every input payload, output response, and execution duration in local SQLite logs.
Advanced Orchestration: Check the AI Fetchly Docs to learn how to pair imported Claude Desktop MCP tools with automated Plan Mode workflows and autonomous background subagents.