Connecting Inbound Mailboxes: IMAP vs POP3 Guide
Closing the Loop on Outbound Prospecting
Launching cold email campaigns is only half the battle in modern B2B demand generation. When prospects reply with pricing questions, technical objections, or meeting requests, fast and accurate responses directly determine conversion rates. Promptly answering inquiries dramatically boosts pipeline conversions, yet sales teams drown in administrative triage across multiple secondary inboxes.
Traditional email automation tools suffer from two major flaws:
- Disconnected Cloud Mailboxes: Shared web platforms pool messages on multi-tenant servers, exposing client correspondence to third-party data aggregators.
- Ungrounded Auto-Responders: Generic rule-based responders emit canned templates that signal an impersonal sales process and alienate buyers.
AI Fetchly resolves this friction with native Inbound Mailbox Synchronization. By connecting mailboxes over secure protocols, aiFetchly ingests prospect replies locally, strips tracking pixels, and drafts tailored responses grounded in your documentation.
IMAP vs. POP3: Choosing the Right Protocol
When configuring your receive service, aiFetchly supports two email protocols:
- IMAP (Recommended): IMAP provides bidirectional state synchronization. It monitors specific folders (
INBOX), tracks read/unread flags across devices, and preserves server-side states. When aiFetchly processes a message, it marks it as read without deleting it from your server. - POP3: POP3 downloads messages sequentially without folder awareness or read-state tracking. It is reserved solely for legacy mail servers lacking IMAP capabilities.
Step-by-Step Tutorial: Connecting an Inbound Mailbox
Follow this walkthrough to configure an inbound IMAP mailbox for AI auto-reply:
Step 1: Open Inbound Receive Settings
- Launch AI Fetchly and navigate to Email Marketing in the sidebar.
- Select Email Services and open your sending service or click Add Email Service.
- Scroll down to Receive Settings.
Step 2: Configure Server Host and Credentials
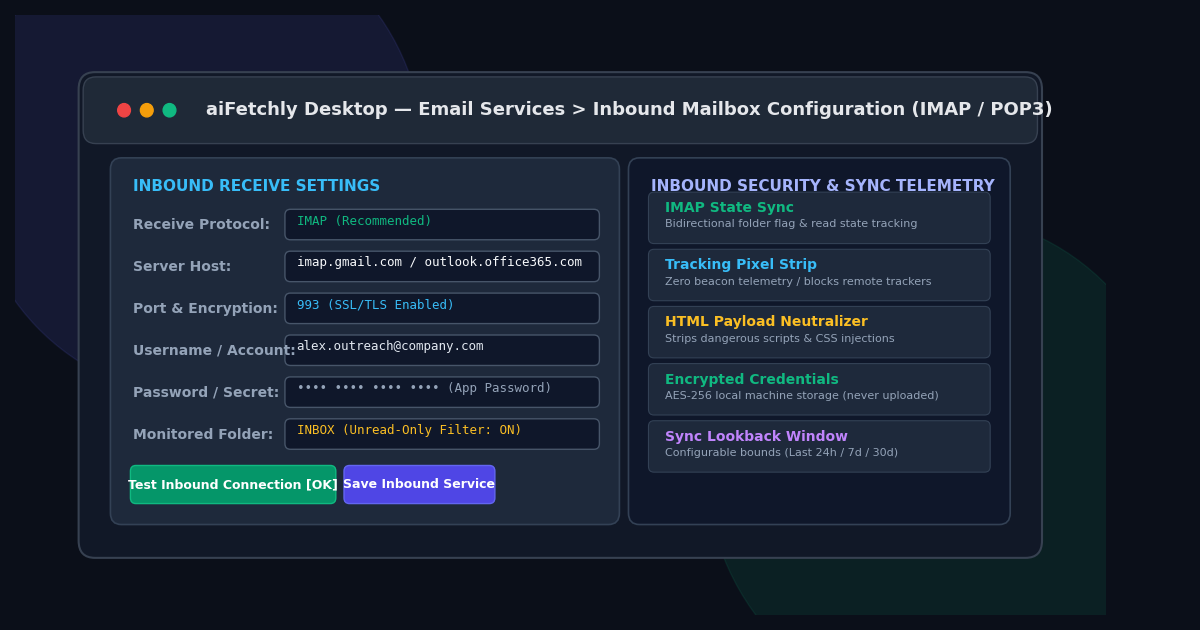
- Under Receive Protocol, select IMAP.
- Input your server host (e.g.,
imap.gmail.comoroutlook.office365.com) and port (993for SSL/TLS). - Toggle SSL/TLS to ON.
- Enter your username and generate an App Password from your email provider.
- Set Monitored Folder to
INBOX.
Step 3: Test and Activate Synchronization
- Click Test Inbound Connection. aiFetchly tests SMTP sending and IMAP receiving separately to ensure clear diagnostic reporting.
- Once verified, toggle Receive Enabled to ON.
- Set your Sync Lookback Window (e.g., last 24 hours) and configure a batch limit (e.g., 20 messages per sync) to avoid rate limits.
- Click Save Email Service.
Inbound Sanitization and Human-Gated Approval
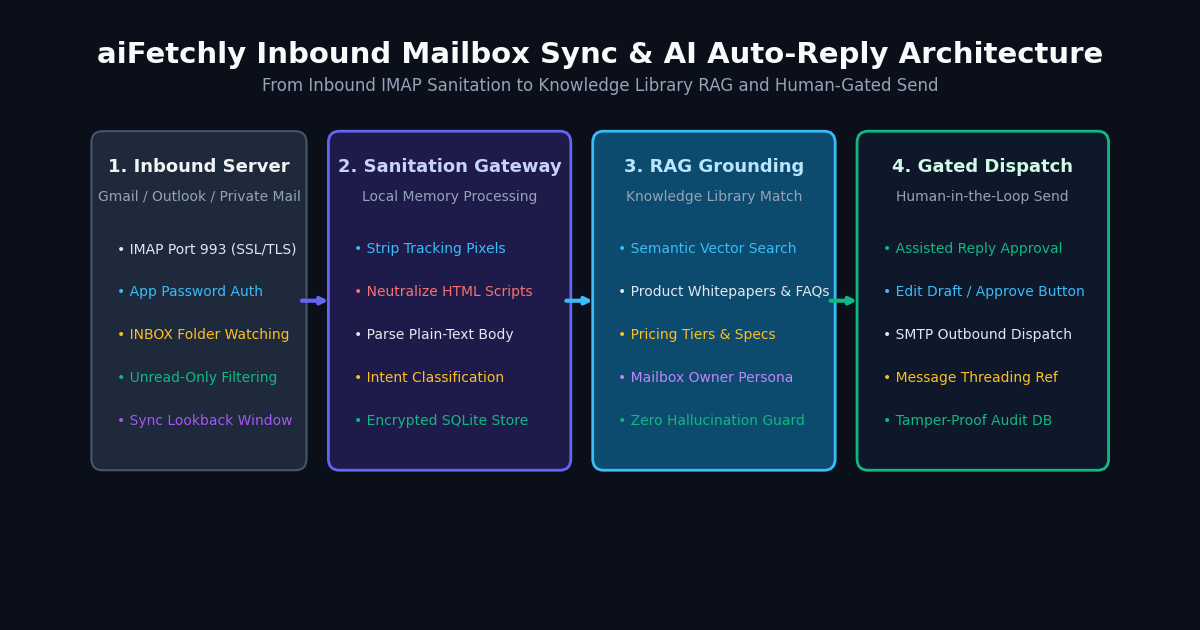
Once connected, aiFetchly ingests unread messages into local SQLite storage. Inbound HTML is sanitized in-memory: tracking pixels are neutralized and dangerous scripts are stripped.
The AI analyzes prospect intent, queries your Knowledge Library, and drafts a tailored response in your persona. Because aiFetchly operates in Assisted Reply Mode, drafts require your explicit click to approve—guaranteeing zero accidental or hallucinated sends.
Image Generation Prompts
- Hero Image Prompt: Modern SaaS dark mode interface displaying aiFetchly Email Services Inbound Receive Settings dashboard, configuring IMAP parameters, SSL toggle, and green verified connection pill, glassmorphic UI cards, emerald and indigo accents, 8k resolution.
- Body Image Prompt: Detailed technical architecture diagram illustrating the aiFetchly inbound email pipeline: IMAP server ingestion, tracking pixel and script sanitization, local SQLite storage, Knowledge Library RAG grounding, and gated human approval before SMTP dispatch.